Map Styles Manual
The Map Styles Editor allows you to customize your job design with connections, nodes, and sections that appear on your project map. To start, open the Map Styles Editor from the Maps page.

The editor is located within Job Settings, which can be accessed by clicking the gear icon next to your job's name.

Under the three-dot menu at the top right, you can click the Map Styles button. This will open a window to edit the styles with three tabs for your connections, nodes, and sections.
Connections
Starting with the "Connections" tab on the left-hand side, you can move the style for the connection with the arrow grab handles to change the order. Order is very important within the editor, as it determines the priority for how styles will be displayed on your map. If a single connection on the map fulfills multiple map style conditions, then whichever map style rule is highest on the list will display on the Map for that connection. (See more on order/priority later in this guide.)
Using the gear to the right of the arrows, you can change specific aspects of the connection's style.
.png?Policy=eyJTdGF0ZW1lbnQiOlt7IlJlc291cmNlIjoiaHR0cHM6Ly9kemY4dnF2MjRlcWhnLmNsb3VkZnJvbnQubmV0L3VzZXJmaWxlcy80MTE2Ni81MzA0MC9ja2ZpbmRlci9pbWFnZXMvcXUvMjAyNS9pbWFnZSgxKS5wbmciLCJDb25kaXRpb24iOnsiRGF0ZUxlc3NUaGFuIjp7IkFXUzpFcG9jaFRpbWUiOjE3ODIyNzI1MzF9fX1dfQ__&Signature=LUaEnIhVlU62EPNFLCG-KPkmrSM81BazMm7sF1oHjfbU1Acl0Rlxx7QJbveuYn~1IRxSXd6C~RUaVj2fO-zXb1dAQWbaOoknF7k2c-m8HPIr3ATgtIw5vfqVH8QBn27HQqKw~~noCT5nsmEpDntABXDMZC9rTmBZnuWOMZiopULw~HRTAIUbMMeDDRv4NzYEE0YnCBu1QmUJvVfJnJ9t2C5Ptco2fp2wPTrYwaRByXPZRAHO3cnWTZ5iXxE0R9px~fLrMtXEWXIB-aTyvY1PgDGzSsm6Df-JPWJTyKUcFNSAuif-B-TKsOYZ3v7YAX6TKGoAVkIwSVZ7iu8OddSUyQ__&Key-Pair-Id=K2TK3EG287XSFC)
Click the gear to open the details window.
.png?Policy=eyJTdGF0ZW1lbnQiOlt7IlJlc291cmNlIjoiaHR0cHM6Ly9kemY4dnF2MjRlcWhnLmNsb3VkZnJvbnQubmV0L3VzZXJmaWxlcy80MTE2Ni81MzA0MC9ja2ZpbmRlci9pbWFnZXMvcXUvMjAyNS9pbWFnZSgyKS5wbmciLCJDb25kaXRpb24iOnsiRGF0ZUxlc3NUaGFuIjp7IkFXUzpFcG9jaFRpbWUiOjE3ODIyNzI1MzF9fX1dfQ__&Signature=f-etq8yM0T72pyTjv3U5Vwr1ondzsBvwwjcoHJDQdhAJX5WVe8YTs55LvPnIWNBHQEaigIE8LCAfEMLcENik4K2mmZlIdE0mDML5qXdKpNul~~v3QcwYZ~AAgA9sxllWoWrLhjtKACelNky2LChe6b5p6RbQOI-rn~HUpsTB~hFDJskI740gFYHD8S~GLA0Ij4G8i5Ewmrt0uKkRxqPfsPr55PWzDaVw2fLjvYNCLB15vgCUxFVk8jB8fwO--8ky0ZJjKkJ93dqJJPhX~PLDZZmR19ehsfvepFz1yxRGAOEnjEjJQ39Ry0YFl9sKDdVH-enddH0EpuYHbOYaLzQ51w__&Key-Pair-Id=K2TK3EG287XSFC)
Within this window, you can change the line thickness, set a solid or dashed line (or a custom line style, which you can learn more about in our Model Editor Manual), and select an icon to exist along the line if you would like.
.png?Policy=eyJTdGF0ZW1lbnQiOlt7IlJlc291cmNlIjoiaHR0cHM6Ly9kemY4dnF2MjRlcWhnLmNsb3VkZnJvbnQubmV0L3VzZXJmaWxlcy80MTE2Ni81MzA0MC9ja2ZpbmRlci9pbWFnZXMvcXUvMjAyNS9pbWFnZSgzKS5wbmciLCJDb25kaXRpb24iOnsiRGF0ZUxlc3NUaGFuIjp7IkFXUzpFcG9jaFRpbWUiOjE3ODIyNzI1MzF9fX1dfQ__&Signature=cWVe~cLzDy7mhJaQL0cA3B7LB3X8eIJSB6q5Im5GDPDwVgBqZIt36PPckPwRni2J0qeRJILlRaXnoD6mUjTT67zTLe0ukkdr-scDDr6~gWoA~tu9RRiBgGBv03tqJbPyOIhucrGuiABTHaJMsWYBcpH5ZkTJ-Crk1feisTjc22n~GRKxMvgrfWyZqtxkZRkGhjgOi6raklimKIzLatiW60Uo2L9KCvVb-q5U6yW-9ekg4la-sKyI7bG8acoq0CLFgZ7qGAtcGQjf37ay60H2XzN-PeEZfFmF5wNlPZyrkb0clZwJLx6WhC5kl-qkpmJVaW7ugRcyMNTgXHIebwDQFQ__&Key-Pair-Id=K2TK3EG287XSFC)
The line icon will be an icon that is fixed on the connection itself, appearing once on a single connection.
Using the “More...” button (.png?Policy=eyJTdGF0ZW1lbnQiOlt7IlJlc291cmNlIjoiaHR0cHM6Ly9kemY4dnF2MjRlcWhnLmNsb3VkZnJvbnQubmV0L3VzZXJmaWxlcy80MTE2Ni81MzA0MC9ja2ZpbmRlci9pbWFnZXMvcXUvMjAyNS9pbWFnZSg0KS5wbmciLCJDb25kaXRpb24iOnsiRGF0ZUxlc3NUaGFuIjp7IkFXUzpFcG9jaFRpbWUiOjE3ODIyNzI1MzF9fX1dfQ__&Signature=IGkrJfzizpW6AglXguM8ln5IK05itpkdDxGtpRf9OWYltStwEC7m1geuD-3KpcgirMJuKuaSxeMjWrQt2N350DvHdom64ngBFWi7F86iB4vZfZM6NFZfl3t1DOelUdPADbT4enGfmG1mzp1aA8tldLX5~5uTrB4I3o3PkXdhI6Hv5MWmXb~ODMQ2KkmtZFDvts4q7u~hH6VLJAxG1O9wmhq0Yqxm1tGsMP8B96uUC-8DYDHrPI2hGSwPbWWd-a8QHSTsQCNDXAAYipXV089L4Qb323-RchT2GlXB395GkMN2UCV2eZGdG0Xj1gN5yEoa-Id2aeJQyisrjyYg0dOLFw__&Key-Pair-Id=K2TK3EG287XSFC) ), you can look for different symbols to use. For more customization, you can use the icon fill and scale fields to change the size and appearance of your line icon. Click on the "x" in the top right of the dialogue box when you're ready to close out of the line settings window; your changes are automatically saved.
), you can look for different symbols to use. For more customization, you can use the icon fill and scale fields to change the size and appearance of your line icon. Click on the "x" in the top right of the dialogue box when you're ready to close out of the line settings window; your changes are automatically saved.
Going back to the main Map Styles Editor, the Color square can be used to set custom colors for your connections, nodes, or sections.
.png?Policy=eyJTdGF0ZW1lbnQiOlt7IlJlc291cmNlIjoiaHR0cHM6Ly9kemY4dnF2MjRlcWhnLmNsb3VkZnJvbnQubmV0L3VzZXJmaWxlcy80MTE2Ni81MzA0MC9ja2ZpbmRlci9pbWFnZXMvcXUvMjAyNS9pbWFnZSg1KS5wbmciLCJDb25kaXRpb24iOnsiRGF0ZUxlc3NUaGFuIjp7IkFXUzpFcG9jaFRpbWUiOjE3ODIyNzI1MzF9fX1dfQ__&Signature=Nd~hbXTi7FdY2rC2MrbttcSmsTACy57M6efnht~56qxos6U1w96nByNWXBnrxoze1bwBOJSPwUQQmt1JStOUYkMFmrnQnEXnjdhP0o3UNCjD9GLhnq3YLLBfoJhejkUFC538bbHVEg1Hx4-V9Hu~R56NMO3UoUMeU-UV6B9oKjzankUrDtQlHDZ6nuPgp~Uck2ynVY-PpI1FvMjVnrT~lXzhkGXdPGlb1wpGEAPcB-H4LXfZzofJpuMclyI4EE2Mfyaivx98lasJ2z2A2ewI-RjiUFLGqBy9URnlUoHIpoJOCWf2MkdSUdOBgZukExMtu9~gicOxa28N-XrR-ibGXw__&Key-Pair-Id=K2TK3EG287XSFC)
Click this square to open the color chooser.
.png?Policy=eyJTdGF0ZW1lbnQiOlt7IlJlc291cmNlIjoiaHR0cHM6Ly9kemY4dnF2MjRlcWhnLmNsb3VkZnJvbnQubmV0L3VzZXJmaWxlcy80MTE2Ni81MzA0MC9ja2ZpbmRlci9pbWFnZXMvcXUvMjAyNS9pbWFnZSg3KS5wbmciLCJDb25kaXRpb24iOnsiRGF0ZUxlc3NUaGFuIjp7IkFXUzpFcG9jaFRpbWUiOjE3ODIyNzI1MzF9fX1dfQ__&Signature=be~-Wx12PmIZugT0um2kCODx4T6ny-C5FHvXuaznNLSYEmg-p-u0tS5xirYZPff~FEqDpMcIo897EaLImqorUDY2KEql~qLxpfRZa3WA4sH1jCij8FR2BcqZacF1fZdHJ8tfmnXHWDl~nTguuMaYK8l6nZZZ2P35mI9CLaHr8w5rfChNiVdNeWUh5n7aQcC3ksYC7QyBF8v8zVcRZZOmdcpfSwK7c~a6HPfKUmPWUV2UXRz~8giGy-G5DX1CLXw2tVUKtuyvpc5Ao~yiLDMOZENpa9o6Zgk~EFQkXXidF~Hx7Tg8HxeLP7QgQkpmmqWId98W~qiytHFr38le9i0tHw__&Key-Pair-Id=K2TK3EG287XSFC)

The conditional statement is made of two to three parts. The first dropdown is the attribute; use this dropdown to determine which attribute will be checked when determining if the style should apply or not. The next dropdown is the comparator:
.png?Policy=eyJTdGF0ZW1lbnQiOlt7IlJlc291cmNlIjoiaHR0cHM6Ly9kemY4dnF2MjRlcWhnLmNsb3VkZnJvbnQubmV0L3VzZXJmaWxlcy80MTE2Ni81MzA0MC9ja2ZpbmRlci9pbWFnZXMvcXUvMjAyNS9pbWFnZSg5KS5wbmciLCJDb25kaXRpb24iOnsiRGF0ZUxlc3NUaGFuIjp7IkFXUzpFcG9jaFRpbWUiOjE3ODIyNzI1MzF9fX1dfQ__&Signature=K1ACkxmqK-nXuff4aH9SVSpOLx5WuvLIzHjdcGv~cwHNRhcdP9WVGb4g8uB4P9D1wygKO7If1SWVvl3pBS3jVjhOo3di8NK0BcYpuW7PDidsPor89etPpm7JzeiAdbuFTttdIL~m2ATWK15VCKqehDshNJJnPW9hkxFCjVSAcmMJgyyLfxd8AXZsFEfPeh-eWTznKFv2GvPypX22XmQi1yJeULOJOWMm6S8n82Ut67q4ZMb9ECF4rYiaAFW61gR8uqGOES7vWlljbiFO62uXA4Dm0mlYXn5rMBfAngy5emHO6nxwxOO8lpNezjsKMg2lUm0zifc~cFJaO4KO~GwtSg__&Key-Pair-Id=K2TK3EG287XSFC)
The "equals" and "does not equal" options will then give you the third part of the conditional statement: an input to choose a value that the attribute should be equal to or not equal to.
The "has" or "does not have" comparators will look for whether that attribute exists or does not exist on that connection (or node or section). (This is when the conditional statement will only have two parts.)
The final part of a style is the three-dot menu to the far right.
.png?Policy=eyJTdGF0ZW1lbnQiOlt7IlJlc291cmNlIjoiaHR0cHM6Ly9kemY4dnF2MjRlcWhnLmNsb3VkZnJvbnQubmV0L3VzZXJmaWxlcy80MTE2Ni81MzA0MC9ja2ZpbmRlci9pbWFnZXMvcXUvMjAyNS9pbWFnZSgxMCkucG5nIiwiQ29uZGl0aW9uIjp7IkRhdGVMZXNzVGhhbiI6eyJBV1M6RXBvY2hUaW1lIjoxNzgyMjcyNTMxfX19XX0_&Signature=QGxZOgS~IGUy6-4aDQej~XYVPU6ndAWHkldrf-8ZMtg4xV6gy25EQSJ1ogJKmJJztJnB9miLiptRyd5aNBwG-nKmTMhAnzMJn4MkzsEX1vDfZlWPDcunxFGhGpt4IbU9b-sXbRGZTNNDwUhDFNz1NVXj~VjOw6d5GChqI9dQCEXcXe5la3Z8syYRFk~aVbVl0osNHhpc4rbFkAMTSJOfs2MUUZRAObFFld0S4poBaU7mRiYMjmNXpQaZDhNujYPT9OsZ2ow5Dj~Z6-n9G~hPbMWVtRsUtx09D0OMES02zEg5~f3Lrw9Xm5VWneAjPMy6rgSzoSmwTFhYHCHhmEBcMg__&Key-Pair-Id=K2TK3EG287XSFC)
You can use this three-dot menu to delete, duplicate, or add a new style below this one.
.png?Policy=eyJTdGF0ZW1lbnQiOlt7IlJlc291cmNlIjoiaHR0cHM6Ly9kemY4dnF2MjRlcWhnLmNsb3VkZnJvbnQubmV0L3VzZXJmaWxlcy80MTE2Ni81MzA0MC9ja2ZpbmRlci9pbWFnZXMvcXUvMjAyNS9pbWFnZSgxMSkucG5nIiwiQ29uZGl0aW9uIjp7IkRhdGVMZXNzVGhhbiI6eyJBV1M6RXBvY2hUaW1lIjoxNzgyMjcyNTMxfX19XX0_&Signature=gV33GSEBz6ud1YaTjkv0N-hu5IijyxQb~KvAyeAWPzuUY7RVjPDD8WB3tSEAVJfTlrBxOMnMQhU9vPNlVEtu8k50wIhkGvGpqnY90-yQoWbj6GrPLI6xd1G0a0B2zjXhK4uvgyo1u0Y9k2K3LVABMFjw1aVhVzU4OMAFCEZmIrZ7nlxbwkaMemu7yVc-a0yr-bH2Bw05eyqtp2UO-2ByJpMrN1h7cU~x29pIdiI0VLALxOGipA0q9cDwdUciGUR2CG4EaCYFa8Pg~946PnNZRfMNUecdpFg1hqF7Fep5HHsYtqS86LSVaDvcsQf788KNeTnIOIkJrUafADM8oVKcbA__&Key-Pair-Id=K2TK3EG287XSFC)
Example
Let's say you need to make a new style for an Underground Cable. First, make sure that "underground cable" is an existing picklist value under the attribute "Connection Type." You can do this using the Model Editor.
See our Model Editor Manual for help adding or editing attributes.
Once you have your attributes and picklist values properly configured and saved in the Model Editor, you can click the “Add a New Style” button..png?Policy=eyJTdGF0ZW1lbnQiOlt7IlJlc291cmNlIjoiaHR0cHM6Ly9kemY4dnF2MjRlcWhnLmNsb3VkZnJvbnQubmV0L3VzZXJmaWxlcy80MTE2Ni81MzA0MC9ja2ZpbmRlci9pbWFnZXMvcXUvMjAyNS9pbWFnZSgxMikucG5nIiwiQ29uZGl0aW9uIjp7IkRhdGVMZXNzVGhhbiI6eyJBV1M6RXBvY2hUaW1lIjoxNzgyMjcyNTMxfX19XX0_&Signature=qb7-V06YweV-UT0tTKON769uL5p~M1dna7p9BqhSzZ14-astWV~Lke9s6iaKk~HRy1hXpVBhxoFjh8J3qrRpsp5VV~rxgj1fVjto94O3P8wh-40THKsrNwofPhBrXz06FdwDRXGGATSN-6DUgNysn6T6tzBKPZ0D1nHKmPNoHQ-4aCR0fH4DCTzzCaMj2wr4DSfagGbD1cD20p6UlAqCFevl1~Oz3Oz5SF5OUe~l9UxtwdvK4UahjMTK~336FLGhmP8Ruor~~krER7koxlp940Pmysc8Ry1sWupFCkg8NEQODvM1Tpp124YIjPuqLx7K4c9wbrMdzCVL10ZKF7KULg__&Key-Pair-Id=K2TK3EG287XSFC)
After setting its order using the arrows, use the line settings to adjust the thickness and style. Choose a color (here we use a red with a FF0000 hex value). For the attribute, choose "connection_type." For the operator, we want the connection type to be an underground cable, so we select "equals" for the second dropdown, and find "underground cable" in the picklist that appears in the third dropdown. With this style defined, we'll click "Done" to save our changes and return to the Map.
If you want to use the style as a template for more jobs so you're not recreating the same styles, you'll want to find the three-dot menu at the top right corner.
.png?Policy=eyJTdGF0ZW1lbnQiOlt7IlJlc291cmNlIjoiaHR0cHM6Ly9kemY4dnF2MjRlcWhnLmNsb3VkZnJvbnQubmV0L3VzZXJmaWxlcy80MTE2Ni81MzA0MC9ja2ZpbmRlci9pbWFnZXMvcXUvMjAyNS9pbWFnZSgxNCkucG5nIiwiQ29uZGl0aW9uIjp7IkRhdGVMZXNzVGhhbiI6eyJBV1M6RXBvY2hUaW1lIjoxNzgyMjcyNTMxfX19XX0_&Signature=HZw5NOkfrNAJjcS0WPocDHVvx4K9tofaWOmNl8YptXn8tczZYT6FYQ6HRY8OL3iiL76YA-BxvNa2IXuwpx0pmA5cDjDb6Yk2O8zkiqv4Ydlw0EXLVEQ6kZPPWz-wvIGJ8VP7Q-0eZNhNXTGL1aiFeyw-TsxhheBeR-tElsPdAAnxrdhmrE0103UYD4YV2IsrFpegQ3wBow8DgcWi7bSL9-chXpscs0IoRuV4nhi8gr~wG48hk1MpMJhNzmHjJBT-TTqJChK6XnUZjvPPn1HF8nacQwghvB5qwrTfeT5raXSd8~fYTyvFWUjhzYHyK-Gi0Sm9i4Pl7NOoDddJ8snrfQ__&Key-Pair-Id=K2TK3EG287XSFC)
This menu lets you save the current styles as a style template (or load a style template from your saved templates). When you click "Save Style Template..." a window opens up with a few options:

You can save the template as a new template or choose to overwrite an existing template. When you select "Save as Existing Template," a dropdown is provided with a list of existing templates to choose from. If you select "Save as New Template," the dropdown becomes a text input where you can name the new template. Check the default box next to this input if you want the template to be the default style for all new jobs you create. Once the template is selected or named, click “Save.”
Changing an existing template or making a new style template the default will not update past jobs. Only new jobs created will use the template if it is marked to be the default. You will need to load this new default style in existing jobs.
Nodes and Sections
Nodes and sections offer more options than connections and are more impacted by their order. Keep this in mind while editing styles for nodes and sections.
.jpg?Policy=eyJTdGF0ZW1lbnQiOlt7IlJlc291cmNlIjoiaHR0cHM6Ly9kemY4dnF2MjRlcWhnLmNsb3VkZnJvbnQubmV0L3VzZXJmaWxlcy80MTE2Ni81MzA0MC9ja2ZpbmRlci9pbWFnZXMvcXUvMjAyNS9ub2RlLXN0eWxlLWljb24oMSkuanBnIiwiQ29uZGl0aW9uIjp7IkRhdGVMZXNzVGhhbiI6eyJBV1M6RXBvY2hUaW1lIjoxNzgyMjcyNTMxfX19XX0_&Signature=ebQgsayFJ29yFO2ExaZ5b8Bh7s8OCBUCjnJtIewoY~-KMdoRPe5IzuFStTmObRkzT7fmjulZicV7aGHN~c0TnbocYEBcAY~rcBlOO4MJvHmt5tUAs8gGPiEnEii5SvFtNCFAMcUb08ZDT83icj~fywZ2VYYMUCcFSKLp8EJ-wGH4i3f9cHJFvJ5q6F4n81jo0GQGfh1PzImSeZUBZkxthmk0JcBBHrLhhNVR5ttF4OrLTqMjVA7wS2ZD~v4ZafRUYVgCFyfNL-GCoAoFheldAE9Qc9iybZQAkDSW8sD1DahniIcydd75yEVVLn3uVUhrqC4VuvnjcZfT33ccDxolug__&Key-Pair-Id=K2TK3EG287XSFC)
Like the arrows in the connections styles, use these to drag and drop the style to rearrange its order. Next to the arrows is an icon; you can click on the icon to see various options for map symbology.
![]()
Clicking “More” will give you more icons to choose from. To choose an icon, click on the one you want to use.
If you find an icon from Google's Material Symbols & Icons that does not appear in our list, click the icon to open its details in a panel to the right, scroll down, and grab the "Icon name":
.png?Policy=eyJTdGF0ZW1lbnQiOlt7IlJlc291cmNlIjoiaHR0cHM6Ly9kemY4dnF2MjRlcWhnLmNsb3VkZnJvbnQubmV0L3VzZXJmaWxlcy80MTE2Ni81MzA0MC9ja2ZpbmRlci9pbWFnZXMvcXUvMjAyNS9pbWFnZSgxNikucG5nIiwiQ29uZGl0aW9uIjp7IkRhdGVMZXNzVGhhbiI6eyJBV1M6RXBvY2hUaW1lIjoxNzgyMjcyNTMxfX19XX0_&Signature=EIoMSSsD0dTaC77a46yMGXo5n3kvyKkTSaLZoogskFGUNw~dC7c6gJYfoBNYHEl883WfCLOkXOaPXqTW3MaihfBh8dYL9IN0FxEwjsTJ2~489607TkLLu0YEX1PPlyOOke4oO8AMmFpKUew2XJsqpVMRcMekBRWV4QwGBcLVY0-Nbh3LeIrND0MfF6K2kvf3yfLmrhoUMl05rntq2pGQ12qhF3gqLQYNlzTzg3ak8bpocIa3xcSD5FYqrk2eYKJO5StCVW9uhHIQ2GhiaRzYTifMwQMjgkI43LHlQ~8Syy3tUoRgmR3NTLQJ6bwt~MWFuK2jBE9XQwAC0Il2bLoN9A__&Key-Pair-Id=K2TK3EG287XSFC)
In the icon window in Katapult Pro, paste the icon name under the "Icon Name" label:
![]()
You'll see a preview of the icon underneath that. If this is the icon you want to use, click the preview to select it. You can also upload custom SVG icons in the Model Editor.
The square next to the icon is the same color chooser that the connections styles use.
![]()
Clicking the double “T” button next to the color chooser will allow you to change the icon size. The bigger the number, the larger the icon will appear on the Map.
![]()
The Σ and conditional statement next to the icon sizer are the same as the ones that appear in the connections style for defining the style criteria. Clicking the stackable icon next to those will turn this icon green and indicate that the style can be stacked on top or below another if both styles' conditions are met (and visible). (See our example further into this manual for how that looks.)
Order
Order matters when multiple attributes exist for a node on the Map—particularly if each attribute has a style rule.

In the above example, if a pole is placed on the map with no attributes other than "node_type" being set to "pole," it will appear as a black circle. If you would add the "done" attribute to the pole and leave it unchecked, it will turn into a red circle. Then if the pole is collected in the field, it would update to be a blue hexagon. Finally, if you check the "done" attribute checkbox, it would turn to a green circle. Even though the location still has the "node type" and "field completed" attributes, the "done = true" map style is highest in this list, so that is the style that is displayed on the map.
If you want to save it as a template, go to the three-dot menu at the top right to save the template. When everything is set in the Map Styles Editor, click "Done."
Custom Logic
Familiarize yourself with the Logic Editor by reading our manual. To understand how this works in the Map Styles Editor, let's explore an example together. Let's say you're mapping addresses, and you want to mark which ones have been verified and which ones have not. Let's say you also want to distinguish each address by its type, such as "residential" or "commercial."

First, make sure you use the Model Editor to set up the attributes needed in this scenario. For this example, I searched for "Node Type" in the Attributes under the Model Editor, added a picklist called "Address," and added a value for "Address."
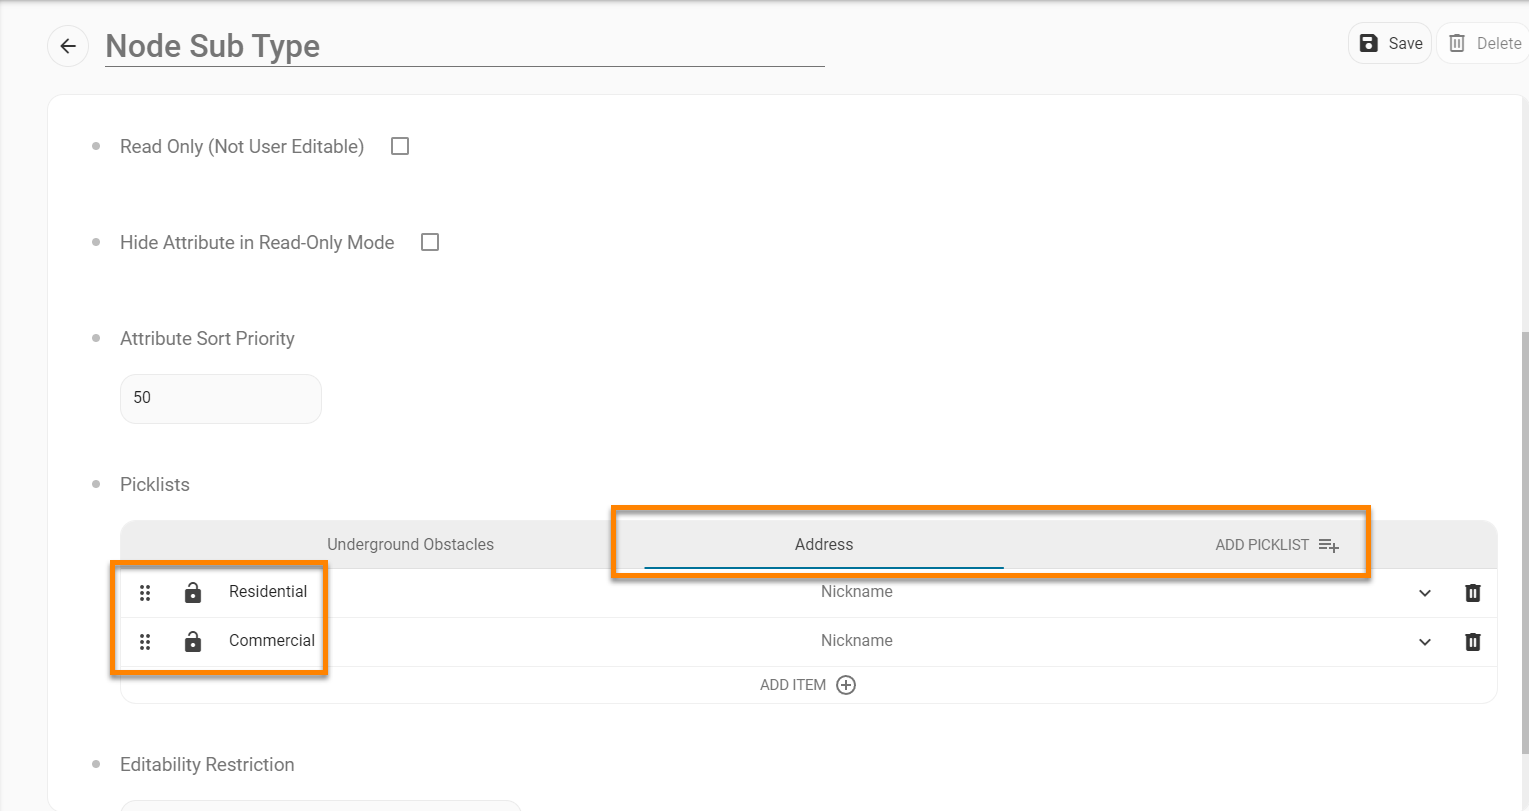
I then found "Node Sub Type" in the Attributes and added "Residential" and "Commercial" values under the "Address" picklist I created. (With a node type "Address" and these subtypes, we can have a 'default' style for an address if its type is not specified.)
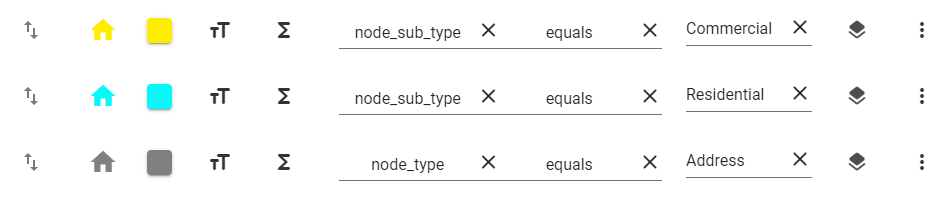
First we set the scene by creating rules for an address with no sub type (a default address), a residential address, and a commercial address. I changed the icon, the colors, increased the size to 30, and defined what the style is for.
Here's how the styles look on the map:

Now for the tricky part! We're going to add a "halo" to houses that have been verified, regardless of what type of house they are.
For my halo style, I chose a filled-in circle icon, changed the color and its opacity (by changing the "A" value from 100% to 35%), and increased its size to 60. I moved the style below the houses so that it'll show up 'behind' the houses when the styles get stacked and made it stackable (as well as making all the houses stackable).
Now we get to use the Logic Editor! I want this style to apply when the node type is address and the address has been verified.

First, we'll click on this little "summation" symbol to open the Logic Editor.

If you read the manual, this structure will look familiar to you. First of all, we're starting with a "Logical And" expression, because we're saying we want the style to apply when the node type is address AND the address has been verified. (In this example, I assume when the field completed attribute is true, which is when a fielder marks a node as done, that the address has been verified.)
Then we have two expressions nested underneath the root "Logical And" block. So for the first part of our condition, "...when the node type is address," the "is" in that statement indicates we need to use the "Equal" expression. Then we'll want to access the type of the node, so this'll require us to use the data path. Data paths can be difficult to work with, but visualizing them as a filing system can be helpful. In this case, we're accessing a node's attribute, node_type. So the data path we get is 'node.attributes.node_type.*'. (The '*' wild card is saying that whatever info is at this level, the node_type level, grab it. Since we don't know what the node_type is for that node, we use the '*'.)
The last part of our condition, "...the address has been verified," indicates another "Equal" expression. We want to access the node's attribute, field_completed, so the data path will be 'node.attributes.field_completed.*'. (Again, we use the wildcard '*" because we don't know whether the field_completed value is TRUE or FALSE.) Since field_completed is a checkbox, this means the value is Boolean, meaning the value is TRUE or FALSE. In this case, we want the value to be TRUE. So we choose a literal block and select "Boolean" as the type and click "TRUE" for the value. Now that our logic statement is built out, we can click on the summation symbol to close that window and click "Done" in our Map Styles Editor.
Here's how the map looks with all of our styles applied:
You can see that there are commercial addresses (yellow houses), residential addresses (blue houses), and "default" addresses (gray houses). The houses with green halos are ones that have been verified (regardless of the type of address, as there are default addresses, residential, and commercial addresses that have the green halo).
Additional Notes
- If you return to older jobs that were created before a style or template was created, you can go into the Map Style Editor window, and in the three dot menu at the top right select “Load Style Template” to load the newly created template for that job.
- You can edit and create custom logic for map styles to add even more specific details to the map.
- Pink lines for connections and pink circles for nodes are used for default styles. If you see these on the map where you did not intend for them, it just means a style is not yet created for that connection or node. You can go into the Map Styles Editor to create the style, and once saved, the line or node will update to represent your desired look.